Price schedule interval windows
Windows used with price schedule intervals:
Entry window
The window is used to add a new interval to a price schedule or sales rule.
The window is opened by the command from the submenu in the context menu of the Specification panel in the window or the Specification panel in the window).

entry window
Form fields:
-
Interval start — interval start time. Required field.
The default value is Opening time, i.e. whatever time the business day is opened.
-
Interval end — interval end time. Required field.
The default value is Close of business day, i.e. whatever time the business day is closed.
Note
Interval start and end times can be entered as a single whole number of hours in 24-hour format (for example 15 to represent 3.00pm) or in the format HH:MM:SS.
Selecting adds the interval to the specification as a new column in the data grid and closes the window. Selecting closes the window without saving any changes.
Editor window
The editor window is opened by the command in the submenu when one interval or one or more prices within an interval is selected. Simultaneous editing of multiple intervals is not possible.

Interval editor (start and end time in the same 24-hour period)

Interval editor (start and end time in different 24-hour periods)
The fields are the same as in the editor window.
Interval start and Interval end fields

Interval start field drop-down list
Options in the drop-down list in the Interval start field:
-
Opening time — whatever time the business day is opened.
-
Same day — indicates that the time entered is before midnight in the day when the business day was opened.
-
Next day — indicates that the time entered is in the 24-hour period following that in which the business day was opened.

Interval end field drop-down list
Options in the drop-down list in the Interval end field:
-
Close of business day — whatever time the business day is closed.
-
Same day — indicates that the time entered is before midnight in the day when the business day was opened.
-
Next day — indicates that the time entered is in the 24-hour period following that in which the business day was opened.
If the interval start or end time is specified as being in the same day, the time entered is displayed in the format HH:MM:SS.

Time displayed in Same day format
If the interval end time is specified as being in the next day, the time entered is displayed in the format Next day HH:MM:SS.

Time displayed in Next day format
The number of columns used to represent an interval depends on the values entered in the Interval start and Interval end fields.
If the interval is defined as being from Opening time to Close of business day, it will be represented by a single column with the header .

All-day interval
If the interval is defined as being from Opening time to a specific time, it will be represented by two columns. The first will represent the period from opening time up to the start of the interval and the second will represent the period from the start of the interval onwards.

First interval from Opening time up to specified time, second interval from specified time onwards
If the interval is defined as being from a specific time to Close of business day, it will be represented by a single column displaying the start time.

Interval from specified time to Closing time
Note
In this case there is no column to represent the period from opening time to the start of the interval.
If the interval is defined as being between two specific times, it will be represented by two columns. The first will represent the period from the start to the end of the interval and the second will represent the period from the end of the interval onwards.

Interval between two specified times
Note
In this case there is no column to represent the period from opening time to the start of the interval.
Specification panel in the Price schedule window
The Specification panel contains a list of the intervals during which the price schedule will apply, and the menu items or menu item shortcuts whose price or availability changes in those intervals.
Note
At least one price in the specification must be different from the standard menu price in order to save the price schedule.
Each interval is represented by a separate column in the data grid. Each menu item or menu item shortcut is represented on a separate row.
If a menu item or menu item shortcut is taken from a draft menu, the Draft column contains the name of the draft to which it belongs.
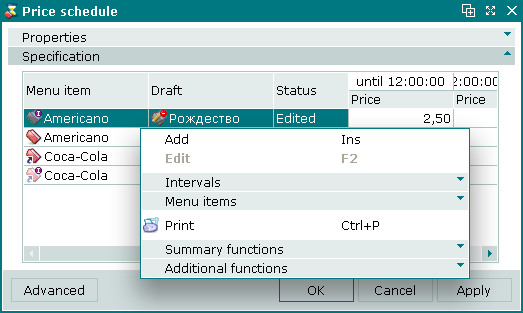
Specification panel of the price schedule editor window
Data grid columns:
-
Menu item — name of the menu item in the price schedule.
-
Draft — name of the draft to which the menu item belongs. This field is empty for items from the active menu.
-
Price — sale price of the menu item during the interval. The column header displays the start and end times of the interval.
-
Status — status.
Context menu commands:
-
— add menu items or menu item shortcuts to the price schedule.
-
— edit menu item or menu item shortcut prices in an interval.
-
— submenu containing commands for managing intervals:
-
— add a new interval.
-
— edit an existing interval.
-
— permanently delete an interval.

Intervals menu
-
-
— submenu containing commands for managing menu items and menu item shortcuts:
-
— add a menu item/shortcut (or draft menu item/shortcut).
-
— edit menu items/shortcuts (or draft menu items/shortcuts).
-
— delete menu items/shortcuts (or draft menu items/shortcuts).

Intervals menu
-
-
— print out.
-
— contains additional commands for working with data grids.
The window is used to add a new menu item to a price schedule. The window is used to edit a menu item already in a price schedule.
New intervals are added using the window. Existing intervals are edited using the window.
The and windows are used to edit prices in a price schedule.
Specification panel of the Sales rule window
The Specification panel is used to enter specific privileges to use in separate periods of a business day.

Specification panel of the Sales rule window
The Specification panel contains a list of privileges for which time intervals can be set.
To apply the <No privilege> rule to the guest tabs or orders, that do not have a privilege, select <No privilege> in the list and set up the interval to use this rule.
Data grid columns:
-
Name — name of the privilege applied.
-
Enabled — specifies whether the privilege is applied in a specific time interval.
The Enabled columns are displayed only when intervals for the privilege are specified.
The period when the privilege is applied is specified using the Interval start and Interval end values. These values can correspond to the opening and closing time or be set for specific time.
Note
When the specified intervals overlap, only start and end time is displayed in the columns. For example, if the interval start time is 9:00 and its end time is 11:00, the table will contain two columns: 9:00 — 11:00 and from 11:00. Adding the interval starting from 12:00 and ending at 16:00, will add intervals 11:00 — 12:00, 12:00 — 16:00, from 16:00 and delete the interval from 11:00.
Context menu commands:
-
— enable privilege for the selected interval in the sales rule.
The command is available, if at least one interval has been added.
-
— disable privilege for the selected interval in the sales rule.
The command is available, if at least one interval has been added.
-
— menu for working with privilege intervals.
-
— print out.
-
— contains additional commands for working with data grids.

Intervals menu
menu commands:
-
— add time interval for the privilege to the sales rule specification.
-
— edit time interval for the privilege in the sales rule specification.
The command is available, if at least one interval has been added.
-
— permanently delete interval from the sales rule.
The command is available, if at least one interval has been added.
New intervals are added using the window. Existing intervals are edited using the window.
The permanent delete confirmation prompt is used when deleting intervals.
After adding the intervals, the Specification panel displays interval start and interval end time.

Intervals added
If the added interval covers all business day, the All day column is added to the panel.
