© Tillypad, 2004-2024

© Tillypad, 2004-2024
During this operation, the segment database and application server are installed.
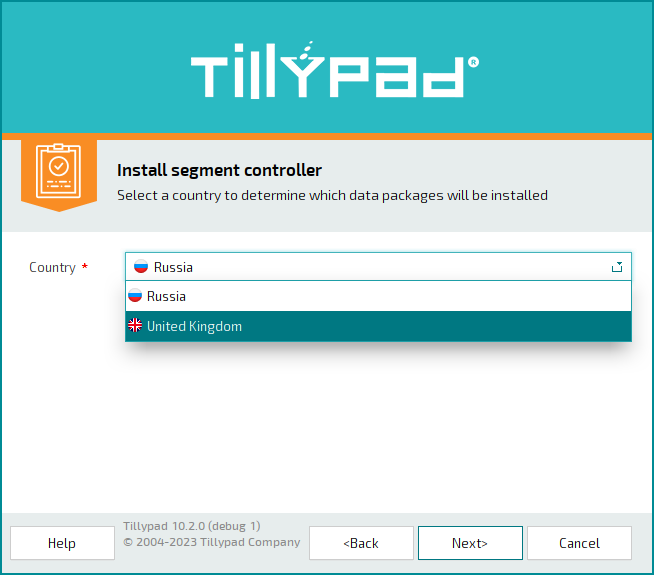
In this step, choose the country for which the installed data set will be optimised. The country selection determines which packages will be installed in the system.
Two countries are available for selection: United Kingdom and Russia.
Selecting the button opens the window with the next filter step.
During the system installation process, update packages are also installed. These include a variety of different objects within Tillypad Manager (reports, software modules, screen form print formats, task types etc.).
These packages can be divided into global, which are used regardless of the country of installation, and local, which are used only in one country.
In a different classification framework, these packages can be divided into three categories: required, recommended, and additional.
Required packages for your country are installed in standard, full, and custom installations. The required packages for another country can be installed as additional packages in a custom installation.
Recommended packages are installed by default in full and standard installations. In a custom installation, they are included in the set of packages marked by default.
Additional packages for the selected country are installed by default along with a full install. They are not marked by default for a custom install.
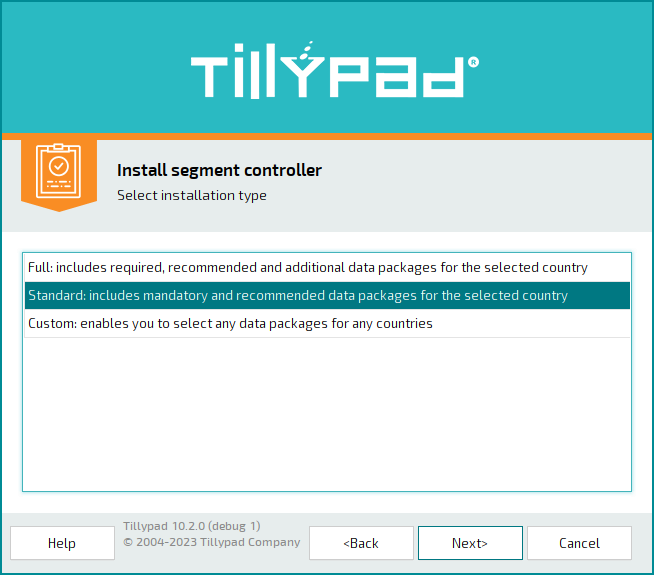
Three installation types are available:
Full: includes required, recommended and additional data packages for the selected country.
When this option is selected, all global required packages as well as all required, recommended and additional packages for the selected country are installed. Editing the installation package suite is not possible.
Selecting this installation type directs you to the input segment parameters step.
Standard: includes mandatory and recommended data packages for the selected country.
When this option is selected, all global required packages as well as the required and recommended packages for the selected country are installed. Editing the installation package suite is not possible.
Selecting this installation type directs you to the input segment parameters step.
Custom: enables you to select any data packages for any countries.
When selecting this installation type, the user can choose which of the recommended and additional packages for the selected country and which of the required, recommended, and additional packages for other countries will be installed during the installation process.
Selecting this installation type directs you to the select necessary packages step.
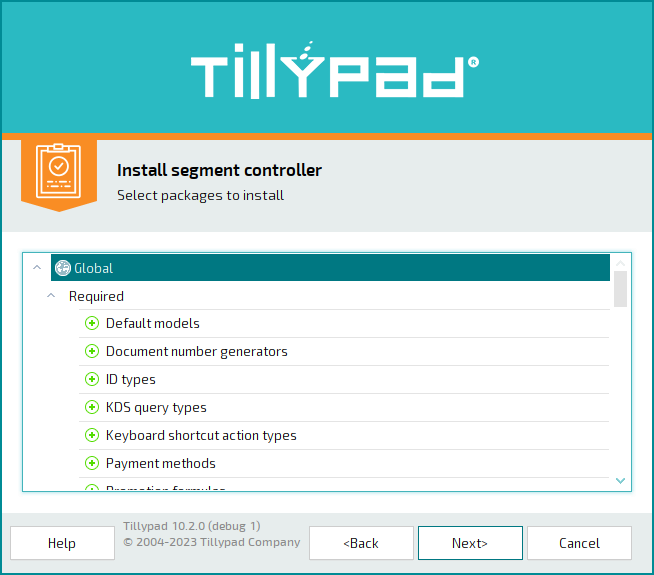
You can only edit the set of packages to be installed when carrying out a custom installation.
By default, in a custom installation the package suite includes the global required packages and the required packages associated with the selected country. These packages cannot be removed.
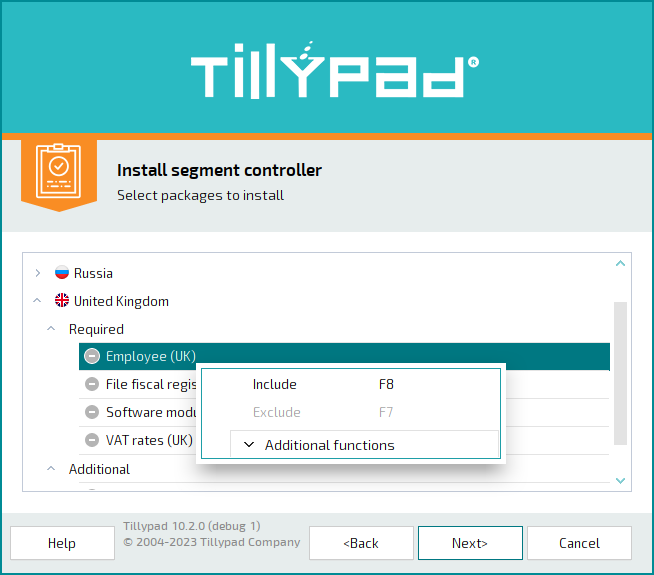
The window displays a tree list of packages. Required packages are marked with the  icon. Additional packages available for selection are marked with a
  , and selected additional packages are designated by a
  .
.
The only packages available to include or exclude in your custom installation are: the recommended and additional packages for the country you have selected and the required, recommended or additional packages associated with other countries.
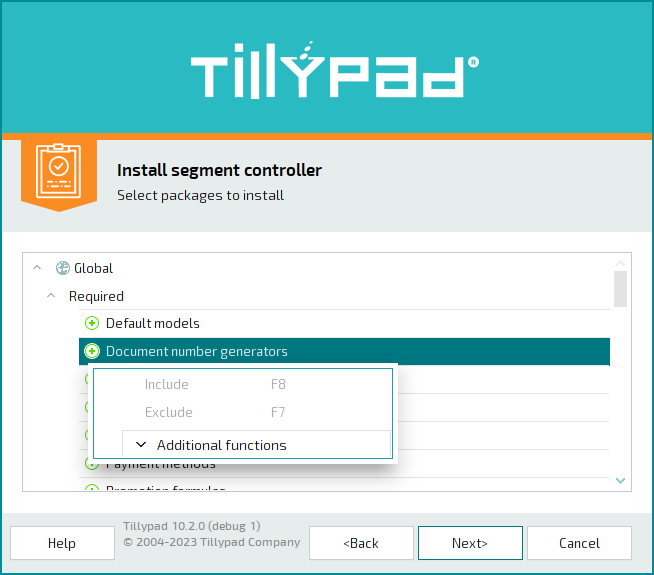
Package list context menu:
(F8) – includes the selected packages in the set to be installed during installation.
This command is accessible if the additional package has not already been selected for installation.
(F7) excludes the selected updates from those to be installed with the installation.
This command becomes accessible for an additional package if it has already been chosen for installation.
Select the necessary packages for installation.
Selecting the button opens the window with the next filter step.
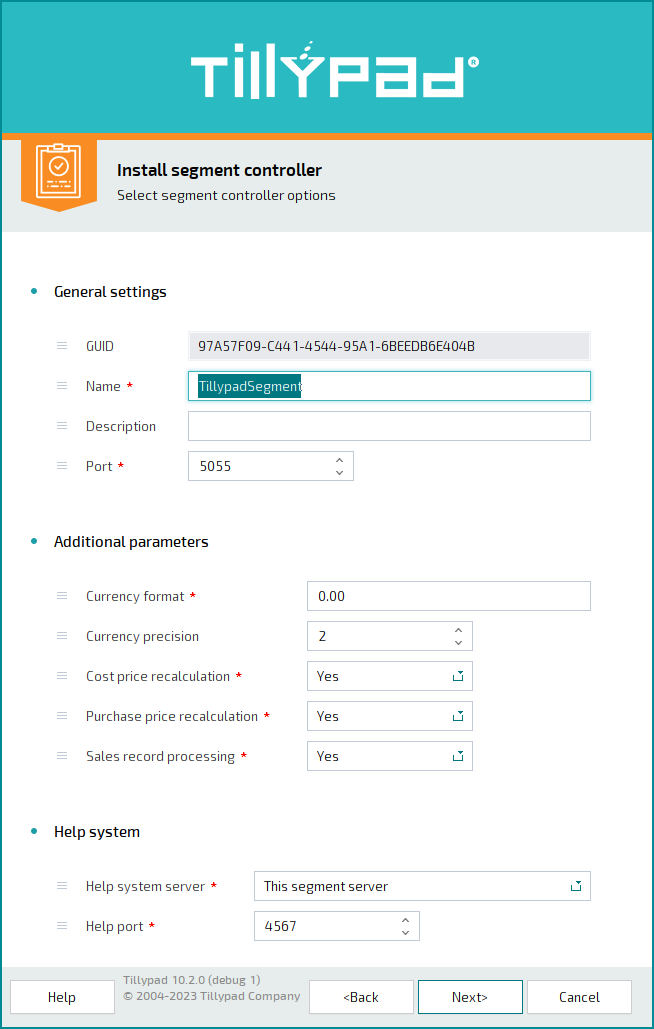
In this step, it is necessary to input the attributes that will be used for installing the segment controller. After the installation finishes, the data will be saved in the and directories of Tillypad Manager.
The window for this step contains the following panels: General settings , Additional parameters , and Help system .
By default, the fields are filled in with data from the initialisation file of the installation program (ini-file).
General settings panel fields:
GUID is the unique ID of the segment controller to be installed. This field is read-only.
Name is the name of the segment controller to be installed. This is a required field.
Description is a short text description of the segment controller.
Any additional information can be entered in this field.
Port is the number of the port used by the domain controller to connect to the database. This is a required field.
The Additional parameters panel is composed of the following fields:
Currency format is the default format for displaying and rounding currency units. This is a required field.
The symbols '#', '0', '.' and ',' are used to specify formats. The '#' symbol means that no trailing zeros (non-necessary zeros) will appear in the box. The '0' symbol means that trailing zeros (zeros in the final decimal position) will also be displayed. The '.' symbol stands for the decimal point. The rightmost period in the format string serves as the decimal point. All other '.' symbols will be ignored. The ',' symbol is used to divide the integer part of the value into groups of 3 digits, i.e. into orders of one thousand. The format entry can also include letters, for example: 'p' or 'pound'.
Examples of how currency units will be displayed in the selected formats are shown in the tooltip balloon.
Currency precision – determines to what decimal place currency units are rounded (i.e. the number of digits that will appear after the decimal point).
Cost price recalculation – indicates whether a recalculation of the cost price must be carried out. This is a required field.
You can choose between Yes and No. If you select Yes, cost price calculation will be launched at the segment server startup or restart. If you select No, the cost price be will not be recalculated.
Purchase price recalculation indicates whether recalculation of the stock item purchase price must be carried out. This is a required field.
You can choose between Yes and No. If you select Yes, stock item purchase price calculation will be launched at the segment server startup or restart. If you select No, the purchase price will not be recalculated.
Sales record processing – indicates whether sales records need to be processed. This is a required field.
You can choose between Yes and No. If you select Yes, sales records processing will be launched at the segment server startup or restart. If you select No, sales records be will not be processed.
The Help system panel is composed of the following fields:
Help system server – the location of the server on which the context help file will be located. This is a required field.
You can choose one of the following options: This segment server or External source.
If you select External source, an additional field, Network name, will appear. In this field, the user must provide data for connecting to an external help system server.
Network name is the network name or IP address of the server where the context help system file is located. This is a required field.
Help port is the number of the port used to connect to the database. This is a required field.
Selecting the button opens the window with the next filter step.
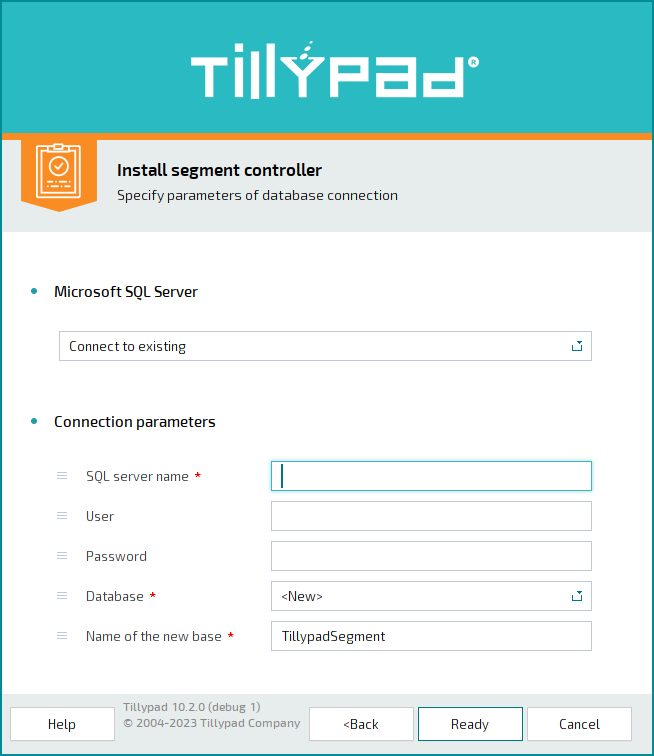
Installation of a segment controller can be run in one of the following ways:
on an existing SQL server:
along with the creation of a new segment database,
using an existing segment database.
Only the segment database can be used to install the segment controller.
When installing a segment controller on an existing segment database, all information in the database is lost.
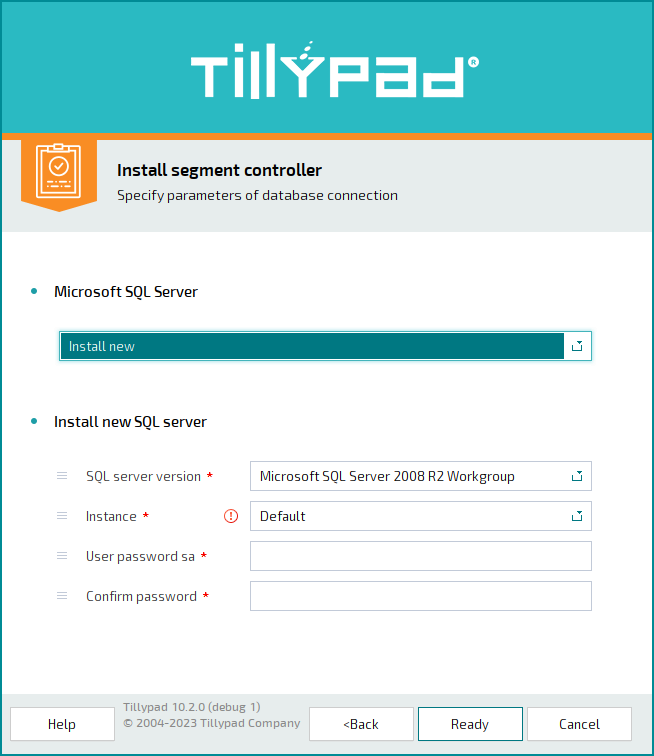
with a newly-installed SQL server and the creation of a new segment database.
In this step, you must select a segment controller installation method and input the parameters necessary for connecting to an existing or newly created segment database.
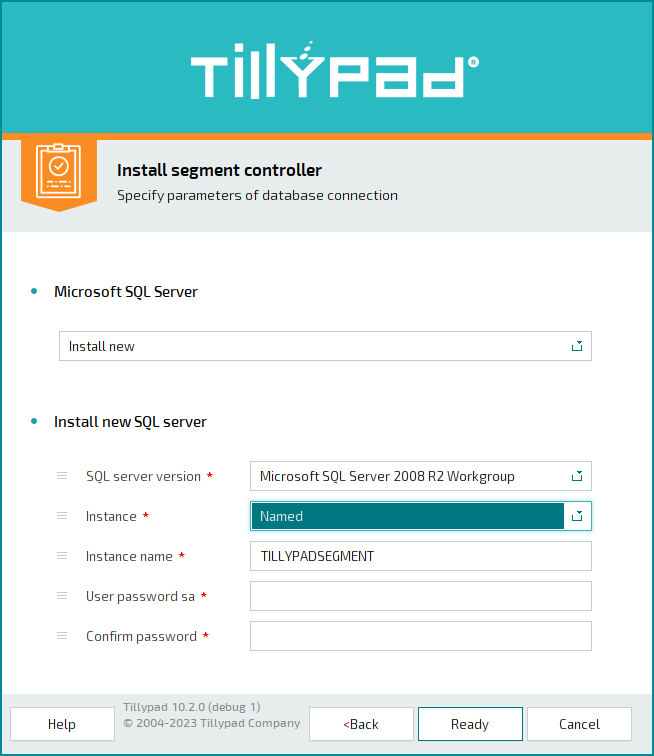
The MS SQL Server panel is composed of a single field. In this field, you can select a value of either: Connect to existing or Install new.
If the Connect to existing value is selected, the existing SQL server will be used for installation of the segment server. The Connection parameters panel is displayed in this step window.
If you select Install new, a new SQL server will be installed. The Install new SQL server panel is displayed in this step window.
The Connection parameters panel is composed of the following fields:
SQL server name is the name of the SQL server.
If the Connect to existing value is selected in the MS SQL Server panel, it will be necessary to specify in this field the full name of the SQL server (computer name \ server name (alias)).
If you select Install new, a new SQL server will be installed.
User is the username of the database administrator.
Password is the password of the database administrator.
If the User and Password fields are not filled in, the Microsoft Windows account will be used for accessing the SQL server.
Database is the name of the database instance of the segment installed on the SQL server.
In this field you can specify the name of an existing segment database instance or input the value <New>.
If <New> is selected, the Name of the new base step field appears in the window.
Name of the new base is the name of the segment database instance to be created.
After you press the button, the segment controller installation will start. The progress of the installation is displayed in a window with a performance indicator.
The Install new SQL server panel is composed of the following fields:
SQL server version is the version of the MS SQL Server that will be installed. This is a required field.
The versions available for installation are displayed in the initialisation file of the installation program (the ini-file).
Instance is the notation method of the SQL server instance. This is a required field.
You can choose between Default and Named.
If you select Default, the name of the MS SQL Server installation program itself will be assigned to the instance; if you select Named, the user will assign the name. In this case, the Instance name field appears in the window.
Instance name is the name of the SQL server instance. This is a required field.
User password sa is the password to be used by the system administrator of the the Microsoft SQL Server. This is a required field.
Confirm password is a field used to confirm the password to be used by the Microsoft SQL Server system administrator. This is a required field.
After you press the button, installation of the MS SQL Server will start.
In the SQL server installation window, you do not need to enter any data. The window simply opens to show the installation progress.
After the SQL server installation finishes, the program will return to the step where you can select parameters for connecting to a server for segment controller installation.
If during installation the server needs to be restarted, after the restart, the installation program will return to the necessary step.