
- Access panel in the Menu item window
- IDs panel in the Menu item window
- Picture panel in the Menu item window
- Photograph panel in the Menu item window
- Stock item panel in the Menu item window
- Price schedule panel in the Menu item window
- Timed service panel in the Menu item window
- Prepaid credits panel in the Menu item window
- Menu
- Menu groups
- Menu types
- Menu units of measurement
- Concurrences
- Sales parameters
- Menu pictures
- Draft menu
- Price schedules
- Own cost
- Sales
- Orders
- Bills
- Receipts
- Deletions from orders (with stock deduction)
- Stop list
- Sales settings
- Divisions
- Store
- Sales records
- Devices
- On-screen button formats
- Advanced
- System settings
- Search for information by ID
- Reports
- Report settings
© Tillypad, 2008-2015
- Access panel in the Menu item window
- IDs panel in the Menu item window
- Picture panel in the Menu item window
- Photograph panel in the Menu item window
- Stock item panel in the Menu item window
- Price schedule panel in the Menu item window
- Timed service panel in the Menu item window
- Prepaid credits panel in the Menu item window
Windows used to manage menu items:
All of these windows are opened from the directory.
The editor window is opened by the command. In this window, you can edit one or more menu items.
The window is opened when one menu item is selected in the data grid.
By default the editor window for a menu item contains the Properties , Access , Picture , Photograph , IDs , and Price schedule panels.
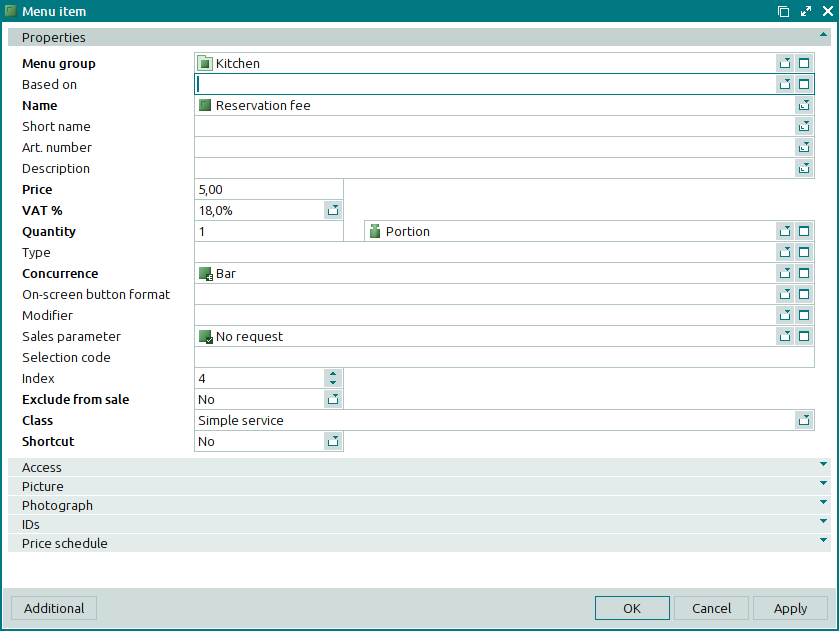
The editor windows for menu items with the class simple services is composed of these panels only.
Additional panels are displayed depending on the class of the selected menu item.
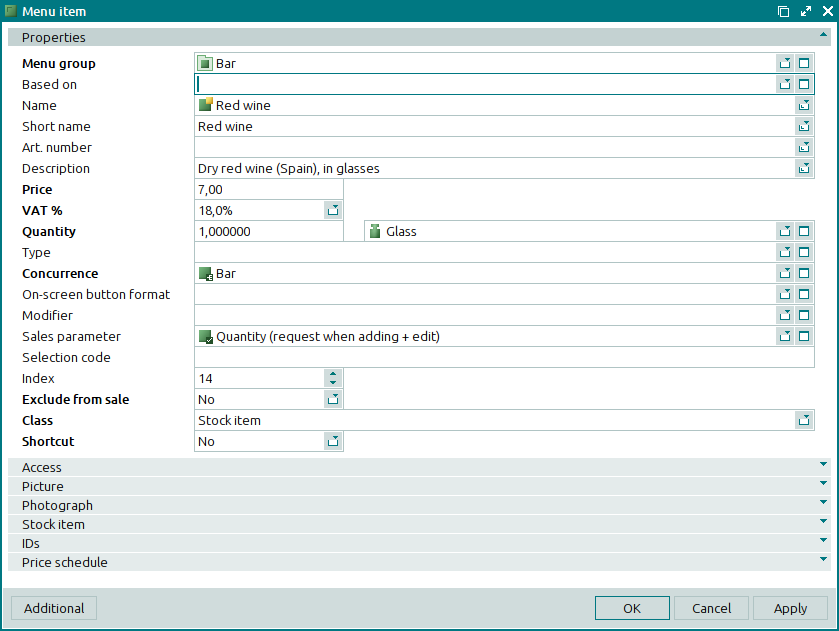
The additional Stock item panel is displayed for menu items with the class Stock item.
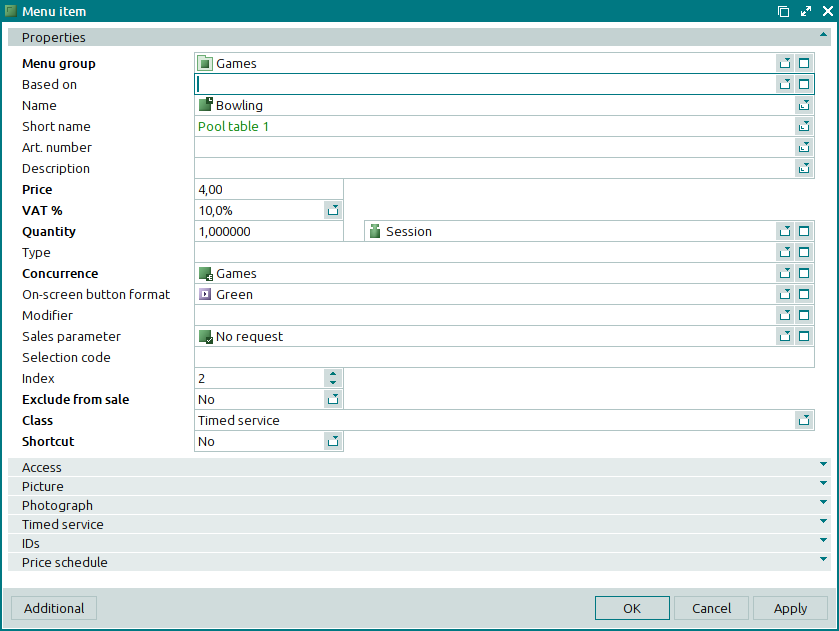
The additional Timed service panel is displayed for menu items marked as timed services.
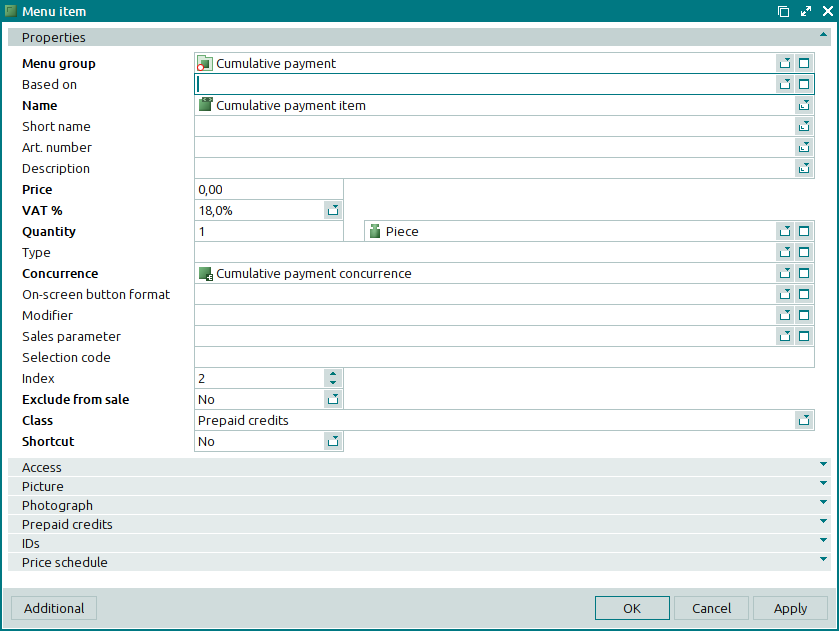
The additional Prepaid credits panel is displayed for menu items marked as order payment methods.
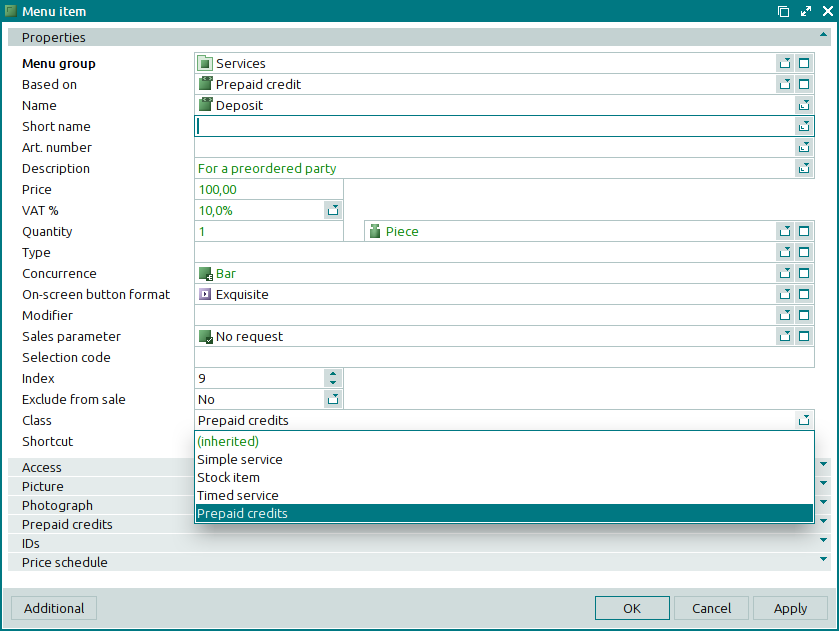
The Properties panel is composed of the following fields:
Menu group is the name of the group that contains the menu item. This is a required field.
A selection is made in the window.
Menu groups help create a hierarchical structure for searching for and selecting menu items on the POS terminal.
They can be useful in organising data in viewing windows and in print layouts of operational and configurable reports.
Based on denotes the name of the menu item from which the selected menu item is inherited .
This field contains the original menu item. The attributes of this original item have been used to create the selected menu item.
Name is the name of the menu item. This is a required field.
This name is used in the POS terminal menu, unless a short name is specified for the item.
The name of the menu item is used in all reports and documents related to the sale of menu items: orders, bills, receipts, and reports.
Short name is a short name for the menu item; this short name can be displayed on the POS terminal instead of the item's full name.
To enable short names in the terminal menu, set the
UseShortNameparameter to True.UseShortName = True
SKU designates the menu item's article number.
Description is a short text description of the menu item.
Any additional information can be entered in this field.
Price denotes the price for the specified quantity (
volume, weight, time) of the menu item. This is a required field.Menu item prices shown here do not include any potential discounts or surcharges.
If the menu item has a sales parameter that allows its price to be changed when the item is added to an order on the POS terminal, this value can be altered directly at the terminal when a user adds the item to an order or edits its properties in an order.
VAT % shows the rate of value added tax (VAT) for the menu item.
Quantity is the number of units of measurement (
quantity, weight, time) in one portion of the menu item (expressed in the preset menu unit of measurement. This is a required field.The quantity is displayed in the POS terminal menu. By default, this value is displayed in the guest tab when the menu item is added to an order.
If the menu item has a sales parameter that allows its quantity to be changed, this value can be altered directly at the terminal when adding the item to an order or when editing its properties in an order.
In the case of dishes and goods, the specified quantity is linked to the stock item deducted from the store when these menu items are sold. The proportion of the menu item's quantity to the stock item's quantity is specified in the Stock item panel.
Unit (menu) is the unit of measurement used to keep records of the menu item quantity. This is a required field.
The value in this field is in no way related to other units of measurement.
The menu unit of measurement is shown in orders, bills, receipts and reports.
Type indicates the menu type that the menu item belongs to.
You can select this value in the window.
is an attribute that can be used to create further categories in which to classify menu items. Menu types can be used, for example, to group wines by country of origin or by vintage.
Menu types can be used for grouping information in the directory and in various reports.
Concurrence is the name of the concurrence with which the menu item is associated. This is a required field.
Please select a concurrence in the window.
Concurrences are used to group menu items with similar sales parameters.
Each menu item must be associated with a concurrence. Whether or not you can select a particular menu item on a given POS terminal depends on whether the menu item's concurrence is included in the Sales settings configured for this terminal.
On-screen button format is the format of the button used to select the menu item in the POS terminal menu.
You can select a format in the window.
The button format defines the appearance of the control key used to select this menu item on the POS terminal screen.
A button format can be used when the
GridButtonparameter in the POS terminal configuration is set to True.Show = ( GridButtons = True
Modifier is a modifier that will be applied to the menu item.
You can choose a modifier in the Select modifiers window.
Modifiers are one or more additional menu items that are served together with a given menu item.
The modifier specification can contain other menu items (
dishes or goods) or instructions for preparation or serving. When choosing the menu item on the POS terminal, the user should specify which, if any, modifiers will be added to the selected menu item.Examples of modifiers:
sour cream or greens served with a jacket potato, pickled ginger served with sushiorsteak doneness level.Sales parameter denotes the sales parameter for the menu item.
You can select this value in the window.
Sales parameters allow the user to change properties of menu items at the POS terminal. This could include changing the order in which the menu items will be served (courses); editing number of portions, quantity, or price when adding the menu item to an order or editing an order; or adding any necessary comments to order items.
The sales parameter determines which operations can be made when a user adds the menu item to an order or edits its properties in an order. Depending on which sales parameter is specified, a menu item may be added to an order at the POS terminal either immediately upon selection or only after specifying additional properties.
Suppose it is possible to add any quantity of a menu item of a specified quantity to an order. The following values are set in the fields of the
Vegetable soupmenu item:Quantity –
200;Unit (menu) –
g.
On the POS terminal the menu item will be represented as
Vegetable soup 200 g. By default, only one dish with these properties can be added to an order. However, you can select a different sales parameter forVegetable soupthat makes it possible to alter the quantity of this menu item added to an order. Then you can add more than one portion ofVegetable soupto an order (for example two dishes,200g each). You can also select a sales parameter that allows the user to change the quantity of menu items. With this parameter set, you can add a portion of the required quantity to an order, and the price will adjust accordingly. For example, a half portion can be added to the order (i.e. one dish of100g). In this case the item's price will halve as well.Selection code is a code for quick selection of an item in the POS terminal menu.
Popular items can be added to an order more quickly by entering their quick selection codes at the terminal.
Index determines the position of the item in the POS terminal menu.
By default, new menu items are added to the penultimate position in the list of items in the menu (i.e. they are given the second to the highest index number).
Ordering values can be used to place the most popular items at the top of a menu group, making them easier to access at the POS terminal.
Exclude from sale indicates whether the menu item is temporarily excluded from sale.
Please choose between No and Yes. The Yes option makes it possible to temporarily exclude the item from sale without deleting it from the directory.
The menu item will be simultaneously removed from the menus of all terminals in all divisions.
Class is an attribute that determines how the menu item is sold and how its price is calculated. This is a required field.
You can select one of the following options:
Simple service;
The option Simple service should be selected for fixed-price menu items which are not counted towards stock adjustment records when sold.
Timed service;
The option Timed service is for menu items whose prices depend on how long the item is in use. If this option is selected, the Timed service panel will appear in the window.
Stock item;
The option Stock item is selected for menu items that are linked to stock items, which must be deducted from the store. The stock items associated with these menu items are added to sales records. If this option is selected, the Stock item panel appears in the window.
Prepaid credits;
The Prepaid credits option is selected for menu items used that can be used to pay for orders (e.g. deposits or preliminary payments). If this option is chosen, the Prepaid credits panel will be added to the window.
(inherited).
This option will be made available if the menu item was created on the basis of another menu item (if the Based on field is completed).
If the (inherited) option is selected in the Class field, the menu item window will be composed of the same panels as the window of the item on which it is based.
Shortcut indicates whether the menu item will be used as a shortcut for the menu item on which it is based.
This value is used to determine the order in which the sales of baseline and derived menu items will be presented in reports.
Please choose between No and Yes.
If Yes is selected, only baseline menu items will be presented in reports, but the quantity of sales will track all sales of derived menu items (menu item shortcuts). If No is chosen, reports will distinctly show the sales of both baseline and derived menu items.
Click to save data. Selecting will save data without closing the window. Selecting will close the window without saving data.
When two or more menu items are selected for editing, selecting the command will open the multiple editor window. The name of the window changes to .
The multiple editor window contains only those panels which are available for all of the selected menu items.
The panels and fields are similar to those in the editor window.
The entry window is used to add one or more new menu items to the directory.
The entry window is opened by selecting the command, by selecting the command, or by attempting to paste one menu item from the clipboard.
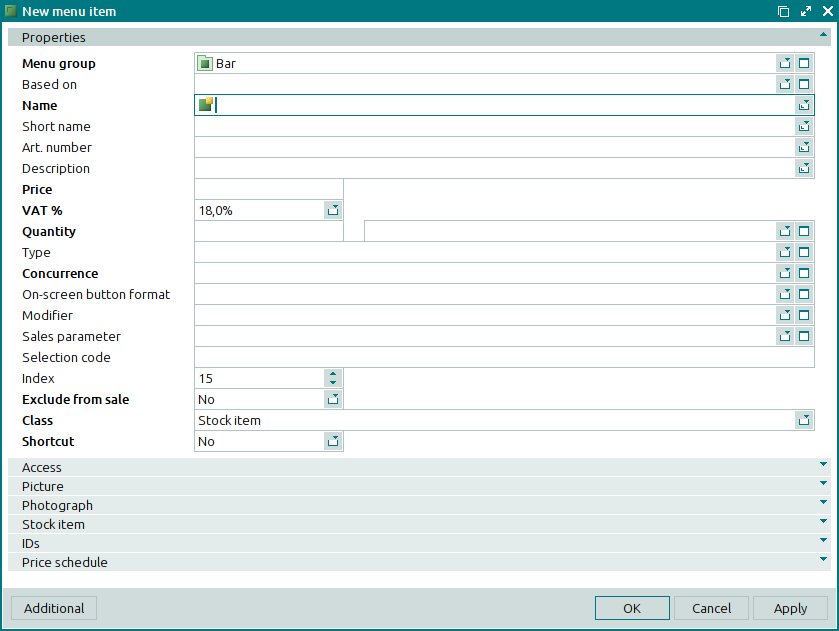
The entry window is composed of the Properties , Access , Picture , Photograph , IDs , and Price schedule panels.
The panels and fields are similar to those in the editor window.
The window opens when two or more menu items are pasted from the clipboard.
The multiple editor window contains only those panels that are available for all of the added menu items. In addition to these panels, the window will display a list of the menu items pasted from the clipboard.
The panels and fields are similar to those in the editor window.